Today I have a fun Sensory Activity. Banana Playdough. It is fun to play with and smells like banana bread — and you can eat it! Our Science Activity is also our Art Activity. Baked Cotton Balls. The outside will be crunchy and the inside is soft white cotton. You can make designs and sculptures on the foil before you bake them. After they are baked you can use a small hammer to smash them, toss them in the air, break them with your hands or just play with them. You can add scent to them before they bake if you wish. Large Motor Activity. With the weather taking a turn toward rain I thought I would add a few inside large motor activities this week. This one can also be a counting / Math Activity as well as Fine Motor Skills. Take two laundry baskets and fill one with items ( sorted sock balls that they have help roll in balls You can talk about what makes them the same / different. Talk about texture, size, color, shape. You can also use balls, wadded up newspaper, small items like cars, animals, etc). Have a race with the “car” laundry basket to the other “car” laundry basket. Move the items to the second one. Time how long it took. Race the empty one back and start again with “car #2”. Variations: Two children? Just race the full baskets next to each other.Don’t want them running because you don’t have a lot of space? Crawl on your knees, sit on your bottom and push backwards with your back against the laundry basket. There are many ways a child can move without it being a run. Only have one laundry basket? Using tongs, or a spoon, to pick up small items that have been distributed on the floor and put them in the laundry basket. Make a race course and move the “cars” on the the course.Throw the sock balls and play basket ball. Set the basket on it’s side and play a version of soccer.Kids like laundry baskets – and boxes. See where they go with this project once you give them the materials. They will come up with some ideas!
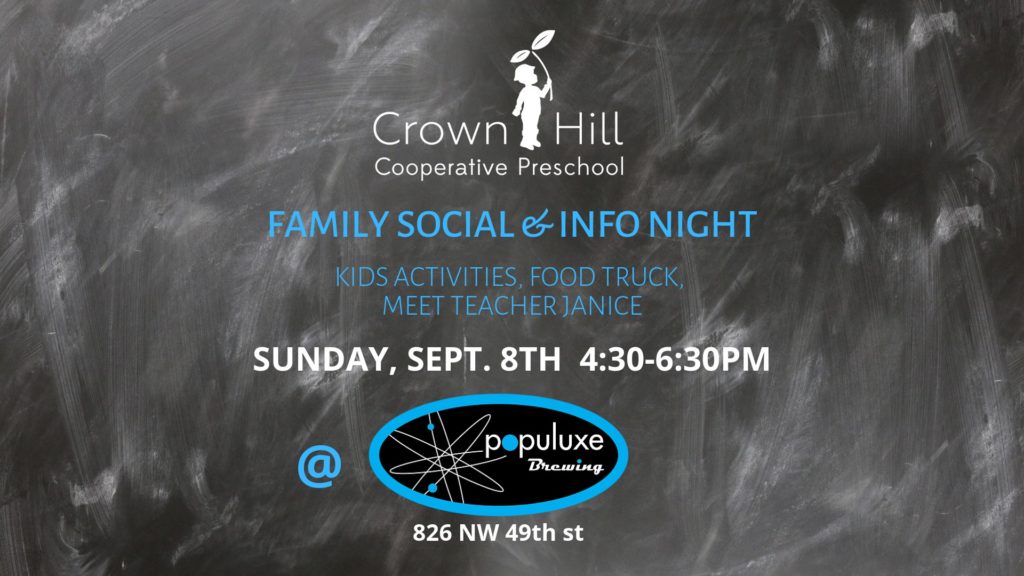
Join Crown Hill Cooperative Preschool families for an early evening out at Populuxe Brewing. New, returning, and interested families are invited to mingle, ask questions, and get to know one another. We have a few spots left in our classes. Registration information will be available.
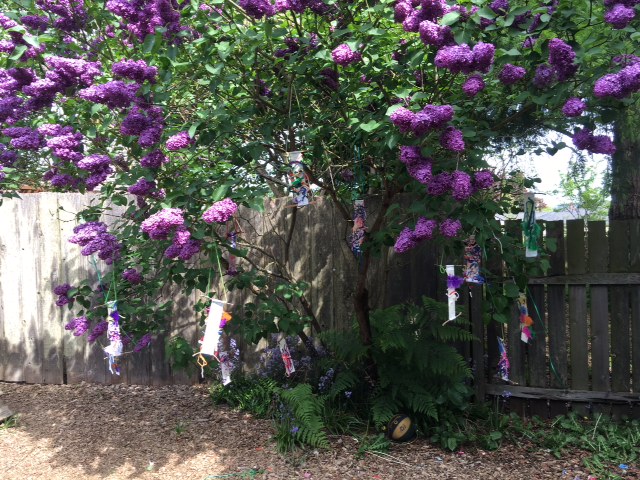
SUMMER IS HERE … but it feels a little like fall. Here is a fun way to start out this cooler weather week as we officially start summer.
When my sons were younger, and I was doing home day care with 6 other little boys, I would start our week by baking bread or making a fresh batch of playdough. This week looks like it will be a great week to make a loaf of banana bread and try out this recipe I found in a book by Asia Citro that my daughter-in-law, Danielle, gave me. 150+ Screen Free Activities for Kids. I will be using this book all summer to share ideas you can use with your children.
Baking with your child promotes interest in what they are eating, math skills, fine motor skills, sensory experiences and scientific investigation. The smell of fresh bread (or anything you bake) will bring back memories of this activity when they are older. A cool, cloudy Seattle day is a great day to fill your home with the aroma of something baking in the oven. I suggested banana bead because ripened bananas are also part of the edible play dough recipe I am including in this note to you.
EDIBLE BANANA PLAYDOUGH
½ cup ripe or overripe banana, mashed
½ cup water
½ cup vegetable oil
2 ¼ cups flour
¾ cup cornstarch
In a bowl, combine the banana, water and vegetable oil. Mix well.
In another bowl mis the flour and cornstarch.
Add wet ingredients to dry ingredients. Knead the mixture until you can no longer feel bits of banana. You can use a mixer with a dough hook if you would like. My sons loved making the mixer “go”.
If needed: add more water if too dry or more flour if too wet.
ENJOY playing with this edible dough.
This dough is perishable so store in the refrigerator in an airtight container. Discard in a few days or when it shows signs of spoiling — if it smells ‘foul’, discolors or has mold.
This is a fun dough to add kitchen tools to when playing with it. Muffin pans, rolling pins, cupcake holders, birthday candles, colored macaroni noodles to poke into the dough, etc.
After you take the frozen ice out of you containers you can explore with the cold ice blocks on the table. Watch as it glides across the table, look at it with a magnifying glass, shine light through the ice, touch it and see what happens to the ice as it melts from the heat of your hand. After you have explored the frozen water set the ice block on a cookie sheet with sides or a shallow pan. Using table salt or coarse salt – or both – sprinkle the ice with salt. Let the salt sit for awhile and watch as it ‘eats’ away at the ice. Shine a flashlight through the ice, use the magnifying glasses again and look at the new shapes made by the salt.
Add color to the ice sculptures and watch as the color makes its way through the crevices created by the salt.If you want to make a permanent reminder of this experiment use paper or paper towel to make an imprint of the colors on your ice sculpture.
ICE-CAVATING
This is an idea sent in by Colleen, Mom of Finn (Bears class) Does your child like to excavate and dig in the dirt? Give them a block of ice with a toy or some kind of “treasure” frozen inside. Let them figure out how to get it out. Chip away with a spoon, some kind of wooden or metal tool, a small toy hammer and chisel. Ask if they can think of another way to get the toy out. Look at the toy with a magnifying glass and with light shining through it. Make shadows …. Explore!
SALT PAINTING
This is a fun art project and by adding a small drop of watercolors to a squiggle of salt, you can demonstrate capillary action. This is the property of liquids that allows them to move in small spaces without external help. The same principle is shown when water “spreads out” on a paper towel, or a flower in colored water takes on the color of the water. The water colors aren’t only a science lesson, they’re super pretty! 1. Lay a piece of heavy paper (it can be construction paper, cardstock or anything else that won’t warp when wet) on top of some newspaper. With a bottle of glue, “draw” whatever patterns you desire. You could write a message, or draw a nice Valentine heart, or just some Picasso-esque squiggles. Make sure the glue lines are pretty thick, but not big puddle2. Pour normal table salt over the wet glue. You’ll need a lot of salt for this. Make sure it gets onto all the glue. You can do this by tilting the paper after the salt is on it. Then shake off all the excess salt onto the newspaper or into a plastic container.3. Using watercolors, paint the salt whatever colors you please. Make sure the paint is nice and watery so the paint brush doesn’t actually have to touch the salt that often. Don’t let it get too wet though, or it’ll wash the salt away. I recommend experimentation.I love the intensity of the color you get with this technique, especially against a darker paper, and the tie-dye-like effect. Happy art making! https://mommypoppins.com/content/weework-kids-craft-easy-salt-painting
SNOW ICE CREAM
Becky, Mom of Wyatt, Bea and Wesley (Orcas class) sent in this idea.Make Snow Ice Cream while we still have some snow outside.. Easy and delicious. Use half and half, sugar, vanilla and, of course, snow. The kids loved it!
PICNIC PARTY
Have a picnic in the living room. (Or under the dining room table, on the bed in the bedroom.). Bring out a table cloth to sit on and let them decide what food to have for the picnic.Decide on a theme. Stuffed animals are often guests at these picnics. How about a Pajama Picnic where everyone wears their jammies? Or a fancy picnic, a clothes on backwards picnic? Then you can read a book while you finish your picnic treats.
SINK AND FLOAT
Always a fun way to spend the afternoon. Fill up a storage container with water. One where you can see through the container is best. Set it on a a plastic garbage bag and towel to absorb the splashed water. Go on a treasure hunt around the house to find items that may “sink” and items that may “float”. Decide what items will go in the “sink’ collection and what items are in the ‘float’ collection. You can make a graph and see if they were correct with their decision on what items would sink and what items would float.
FREEZE DANCING
Play some music and when it stops everyone freezes. Decide on how they should freeze — like an animal, like a letter of the alphabet, something silly, a yoga position, etc. RED LIGHT GREEN LIGHT is also a fun version of this stop and go kind of game.
Enjoy your day with the kids. The snow will go away and we will be back to ’normal’ soon and this will just be a memory. A fun memory!
It looks like we may have one more Snow Day before it turns back to Seattle Slush Days.
Here are some ideas I found online at https://www.parents.com. They looked like fun. While it is still cold enough I am going to go try the frozen bubble idea. Ornella, Mom of Jackson,Oliver and Wilder (in the Orcas Class)had a fun idea. Bury glow sticks in the snow and go look for them. It is similar to the colored ice cube hunt but you can do it at night! Such a great idea!
Cold Mold
Borrow some pans from the kitchen. Use them to build crystal fairy castles or to create cakes for a cold-weather “buffet”
Ice Maker
When the temperature drops below 32 degrees, blow bubbles and watch them freeze on the wand.
For the Birds
Hollow out an orange and fill with seeds to feed your feathered friends.
Ice and Easy
Freeze colored water into ice cubes, then hide them around the yard for a wintertime scavenger hunt”
As we enter our third day of Snow Days it may be harder to find enough snow to play in outside so bring some inside! Get a large pan, cookie sheet with sides or a plastic storage box – the under-the-bed sweater boxes are the best. Put the container on the floor with a garbage liner and towel to protect your floor or on the kitchen table. Here re three ideas for inside snow activities. Kev had River paint with paint brushes and set up a science activity to watch how long it took for the snow to melt.Danielle had Ansel use a squeeze bottle to change the snow to green. If you have pictures of your child painting the snow please send them to me and we will add them to our snow wall.
Paint the snow…. Use paint brushes, eye droppers or squeeze bottles to paint the snow with food coloring or liquid paint. If you do not have any of those tools you can just use spoons to drop the paint onto the snow. It is fun to mix the colors and watch them blend.
Next idea …..
Play with dinosaurs or animals in the snow.
Build a construction site in the snow …
Snow is a great sensory activity for your child. Talk about how it feels, how it changes (melts, molds/forms shapes, crystalizes). You can watch as it changes back into water and discuss why it does that. And, of course, talk about the weather – cold and sunny, wet and cloudy, snowy and windy) Have fun exploring the snow with your child.
Talk about the light and how it shines on the snow.
Look for things that are frozen. Can you find ice that is in the process of melting because of the sunshine? Is there ice that has melted and has frozen again overnight?
Shadows! Make shadows on the snow and then on the grass. How are they the same and how are they different?
Snow on the mountains. Why does it stay on the mountains even though it is sunny today? Why does it melt on the street but not on the grass?
Look for snow sculptures, snow people, snow forts. Can you find tracks in the snow where people, dogs, cats and birds have walked on it. Do you see tracks from sleds and from rolling a ball in the snow?
Measure the snow. Is there more snow in the shade? More snow under a bush? Do you see snow on the roof of a house?
Enjoy a walk through the neighborhood on this sunny snow day. Hope to see some of you in class tomorrow ….
With the cold weather and snow the birds are on the hunt for food — and water. Here is a simple bird feeder you can make with items you have at home. The bird seed may be the only thing you don’t have but you can substitute uncooked oatmeal for the birdseed. It is a little less messy and the birds love it.
First cut a shape from a piece of cardboard, cardstock or something stiff. You can also use a stick or piece of wood. The birds have a natural place to sit. 🙂 Add a string, twine or a pipe cleaner for the feeder’s hanger.
Next you will need bird seed or oatmeal and something to use as “glue”. Nut butter or shortening work well as the “glue”.
Spread the “glue” on the shape or stick.
Shake off the excess — this can get messy so be sure to do it over a piece of paper or outside.
Take your bird feeder outside and hang it from a branch on a tree or a place the birds can find it….and probably the squirrels as well.
If you hang it near a window your child can watch the birds come and eat from their feeder. Enjoy!
First pick some water proof items to make the interior sculpture with.
Next you will need a plastic baggie or a plastic container.Yarn and / or a pipe cleaner
Place the items in side the baggie or the plastic container
Add water to the baggie / plastic container. Set the baggie in the container if you choose to use the baggie. Submerge a long piece of yarn, twine or pipe cleaner into the water, This will be the hanger for your ice sculpture.
Set the sculpture out side in the snow / on your deck or porch. After it freezes remove the sculpture form the plastic baggie / container and hang it up. It will glisten in the sun (which is coming on Wednesday!)
With the temperatures below freezing at night and near freezing during the day your sculpture should last several days. This is a great way to show your child how water freezes, talk about weather and temperatures and get them excited about doing science experiments.
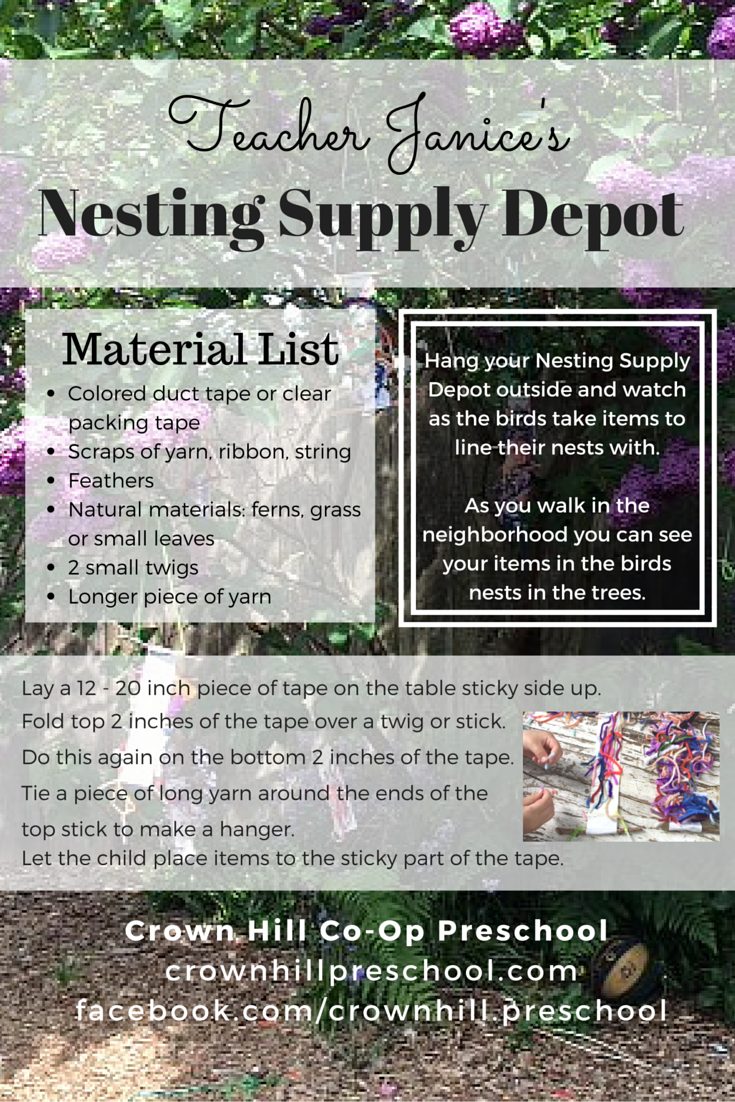
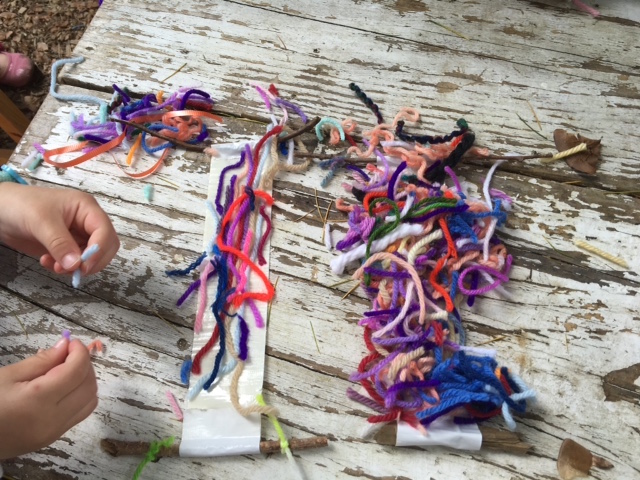
Lay a 12 – 20 inch piece of tape on the table sticky side up.
Fold top 2 inches of the tape over a twig or stick.
Do this again on the bottom 2 inches of the tape.
Tie a piece of long yarn around the ends of the top stick to make a hanger.
Let the child place items to the sticky part of the tape.
Hang your Nesting Supply Depot outside and watch as the birds take items to line their nests with. As you walk in the neighborhood you can see your items in the birds nests in the trees.